Showing posts with label Natural Living. Show all posts

May 6, 2011

Grow Your Own Fruit

A couple of months ago, I walked into Trader Joe's (where I do my primary grocery shopping), and saw this in the produce section:


Pummelo (also known as pomelo) for $1.49 each.  I happen to have a pomelo tree in my backyard, and they are MUCH larger than the ones at Trader Joe's.  This year we harvested roughly 100 of these from our tree, but mine were organic.  At Trader Joe's prices, that's $149 in fruit that I got for free.

I also have a tangerine tree.  These sell for about $0.60 each.  Our tree produces about 300 pieces of fruit, which means that we harvested about $180 in free food from that tree.

Consider planting some fruit trees in your yard.  They provide excellent shade, decrease the cooling costs for your home, improve the air quality around your home, and are an amazing source of organic food for your family.  Talk to someone from your local nursery to find out what the best varieties are for your region and when and how to plant them.

April 29, 2011

Homegrown Revolution

Last week I shared my favorite website for urban homesteading, Path to Freedom's Little Homestead in the City.  Here is a ten-minute "documentary" called Homegrown Revolution that gives you a little tour around their property.  It will inspire you like crazy!

April 15, 2011

Health 101: Meat and Dairy

Learning how to eat in a truly healthy way requires gaining knowledge beyond what you learned in school, from food commercials and from product gimmicks.  But gaining that knowledge can be overwhelming.  I've received several requests recently from those who want to start eating a more natural, healthy diet, but don't know where or how to start.  This has prompted me to write a series of posts that I will call Health 101.

Today we will start with meat and dairy. This is the food category that I believe can make you the most sick if you are careless about what you eat. Meat is loaded with antibiotics (thanks to the foul and disgusting living conditions of the animals). When you eat that meat, those antibiotics transfer to you and your family, causing a greater resistance to antibiotics in your own body. I believe that most Americans use FAR TOO MANY antibiotics, which is dangerous on many levels. Then they add to that the antibiotics in the meat. Then when they get dangerously ill and need an antibiotic, they don’t understand why it isn’t effective. Their body has built up a resistance to it.

Meat is loaded with growth hormones. Farmers make more money when there is more meat. The disgusting living conditions are not conducive to proper growth, so a growth hormone is necessary to maximize the farmer’s profit. These hormones produce great havoc in the human endocrine system. It is heartbreaking to hear of young girls developing breasts and beginning their menstrual cycles long before age ten (which I think is still young), thanks to the growth hormones they consume in their meat and dairy on a regular basis.

In addition to these toxic chemical substances, these animals are fed nasty food that does not belong in the food chain. It is not unheard of to find ground up animal parts in the feed. This produces such health problems in herds as “mad cow disease”. Speaking of beef specifically… cows are ruminants, which means that they eat foods that must go through an extensive digestive process. God designed them with 4 stomachs to accomplish this job. They primarily thrive off of grass and other such vegetation. Corn is NOT a natural food for cows. But the majority of beef in your supermarket comes from corn-fed cows. This creates an inferior meat, a meat that is insufficient in the nutrients it OUGHT to have, etc. It also produces a sick animal… back to the antibiotics and other meds that go right into their meat.

It should be obvious that dairy products contain these same properties (the antibiotics, hormones, etc.). If you choose to consume dairy products, the BEST choice is goat products. Goats only have one stomach, just like us, and their milk is much easier on our digestive systems. In fact, many people who are allergic to cow milk can easily tolerate goat milk. Goat milk has an acquired taste. And it is much more expensive. If you are going to choose cow dairy products, there are a few things you should do your best to look for. Raw milk is the best choice, but many states have outlawed the sale of it, unfortunately. The next best thing is to look for unhomogenized milk.

 I buy a milk at Trader Joe’s that’s called Cream on Top (it is not homogenized). Homogenized milk is put in a machine and spun at dizzying speeds in order to separate the milk molecules. The forces the milk and cream to remain combined, thus not allowing the cream to rise to the top. The problem is that the milk molecules are now so small that they are able to permeate through your stomach, intestines, and blood vessels. This is one of the primary causes of scarring in the arteries. When the arteries are scarred, cholesterol has a place to hang on. When arteries are smooth and healthy, cholesterol has no place to lodge, even if your cholesterol levels are high, and it will have no negative effect on you. So do yourself a favor and stop drinking homogenized milk! It’s much more difficult to avoid pasteurized milk, due to the laws in most states. But if you are able to find raw milk, grab it!

The same goes for your cheese, yogurt, sour cream, etc.

The very best starting point, if you are overwhelmed, is to start with ORGANIC meat and dairy products. From there, begin your search for unhomogenized dairy products.

If you are having a hard time finding organic meat, at the very least look for something that is labeled “no hormones, no antibiotics ever”. Oftentimes, those meat products are organic, but the company hasn’t had the funds to get organic certification. Sometimes, though, it’s not labeled organic because of the feed the animal received.

While on the subject of meat, my husband and I have made the firm decision to honor God’s instructions in the Scriptures pertaining to clean and unclean meat. Although both of us were raised to believe that God’s dietary laws no longer pertain to us today, we honestly do not find anything in Scripture to support that. We also see that God knew what He was talking about when He categorized animals as clean and unclean. As the Creator of all things, He has all wisdom about what He created. Our modern science is now able to help us understand what makes the unclean animals “unclean”. Modern science has shown that these animals were truly not designed for the purpose of being food. The overwhelming majority of these unclean animals are actually the “vacuum cleaners” of the earth. Pigs, birds of prey, all cats, shellfish, etc. They all clean up the dead and diseased filth of the earth. Those disgusting things that they consume go straight to their meat. God did not design them to filter out those toxins, but rather to take those toxins into their meat in order to clean the earth. This poses a HUGE health risk for humans who consume their meat!

In fact, if you want some scientific evidence for never eating pork again (or any of the myriad ingredients that are derived from pork), do a short bit of research online on the trichinella parasite. It is widely prevalent in pork (but also other “unclean” animals that aren’t so popular in the USA).

There are so many good “clean” animals to eat that I have little complaint about giving up the nasty, putrid unclean meats that make so many people so sick. If we want hotdogs (which are a rare “treat”), we buy the Hebrew National brand because we know we can trust what kind of meat is in it. If we want bacon, we buy turkey bacon. I know it’s not the same, but sometimes you really need it for a favorite recipe, mostly for the flavor. Make sure it has not nitrates or nitrites (toxic). If we want sausage, we have found many kinds of chicken sausages that are absolutely delicious!!!! I just make sure that they do not have pork casings.

CLICK HERE to view a list of clean and unclean animals.

April 4, 2011

Jojoba Oil

I have been attending a monthly class to learn about using herbs to improve health.  The last class I attended was exceptionally fun.  The fifteen women in attendance enjoyed facials with homemade products.  After using a blend of oils and herbs to cleanse the face, we did a clay mask.  We finished up, not with moisturizer as I had expected, but with 100% pure jojoba oil.

I have never used straight oil on my face.  My forehead turns into a grease pit quite easily, and it just didn't make sense to put oil there on purpose.  But for the sake of experimenting, I tried the jojoba oil.

The next morning I showered, and when I finally got in front of the mirror, I was stunned!  The skin on my face looked like it belonged to someone else!  It was so smooth, clear, and glowing.  My forehead was not oily like I thought it would be, even after hours of sleeping.

Jojoba oil isn't really an oil, but rather a "wax ester".  Out of all the compounds in nature, it is the most similar to human skin oil (sebum).  The theory is that jojoba can cause your skin to think it has produced enough oil, thereby balancing oil production.

Jojoba oil is not water-based, so it does not evaporate during the day like moisturizers.  It's easy to spread over the skin and it absorbs well.  Unlike most oils, it does not become rancid or lose antioxidants over time.

You can apply it directly to your skin, or add a few drops to your moisturizer before applying.  It works beautifully to remove makeup without irritation to the eyes.  Jojoba oil is very beneficial as a hair product.  Massaging it into the scalp helps prevent dandruff.  A small amount can be worked into the hair as a leave-in conditioner.

Jojoba oil can be expensive, but it is worth every penny.  Considering the number of products it can replace, it is a work-horse ingredient.

March 23, 2011

Selecting Seeds

In my last post, I showed you how to build a simple raised garden bed so you can begin growing some of your own food.  Once your garden is in place, it's time to plant.  But what should you put in there?  Some people purchase starts from a nursery or garden center.  There are two reasons why I don't do this: these usually are not organic (an important factor for me), and they are expensive when compared to the alternative.

What is the alternative?  Buy seeds and plant them directly into your own garden.  If you live in cooler climates, a small greenhouse might be a great way to get an early start on growing your seeds.

How do you choose seeds?  There are three things that I look for: organic, non-GMO and heirloom.  Organic is the most important factor for me in buying seeds, but I also look for heirloom... seeds that haven't been tampered with over time, and non-GMO (similar to heirloom in that they have not been genetically modified).

There are three terrific sources I like to recommend for obtaining seeds.  I purchase most of mine at Whole Foods.  They sell a brand of seeds called Botanical Interests.  Another fabulous seed company is Seeds of Change.  I love what this company is doing.  Another company that I like is called Baker Creek Seeds.  They really focus on preserving heirloom seeds as well as rare seeds.  All of these are great resources for the best seeds.

Seed catalogs or websites are great places to stir up some inspiration.  What do you want to grow?  Do you have enough garden space to grow all the things you want?  Draw a "map" of your garden.  This will help you to decide what to plant and how much.

Happy gardening!

March 21, 2011

How To Start a Garden


I believe that I have fully recovered from being a former garden-hater (see the “About This Blog” page for the full story).  I can only laugh at myself as I sit here at my computer and put together a post about starting a garden.

My first major step toward garden-hating recovery took place two years after I had married and moved to Arizona.  My husband and I had made plans to spend the entire summer in Washington/Idaho with my family.  I called my mom on the phone and emphatically insisted that she wait until I got there to plant her garden, because I wanted to help.  I’m not sure if she passed out or became light-headed, because she never revealed her physical reaction to my demand. 

It wasn’t until years later that my husband and I finally bought our first house and lived in a structure other than an apartment or condo.  We had so much space in our backyard that was not being used that the thought occurred to me that I could plant my own garden.  But gardening in Arizona and gardening in the Pacific Northwest are two different things!

Can I plant in this soil that has the consistency of concrete?  What can I plant?  When do I plant it?  Can I grow throughout the torturous summer heat?  Can I grow through the winter, even if it freezes for a few nights?  I had so many questions and virtually no answers. 

My garden-loving mother bought me a book that got me started in the right direction:  “All New Square-Foot Gardening” by Mel Batholomew. 

This book taught me the how-to of creating above-ground garden beds, how to grow far more in the square-foot method compared to the straight row method, and how to grow vertically in a raised bed. 

The best resource for those who do live in the Sonoran Desert is the Mary Irish book, “Gardening in the Deserts of Arizona”.

This book gives great detail about what to do with your garden, flowers, lawn, and trees each month of the year. 

With the knowledge from these two books, I finally had the courage to give desert gardening a try.  I began with one 4’x4’ bed.  A year later, I added a second bed.  This year I have added two more beds.  This gives me a combined total of 64 sq. ft. of garden space.

Once you’ve selected the location for your garden bed, you will want to prepare the ground.  My yard is full of granite, so I had to shovel it up to make way for my garden.


Next, I placed a layer of weed cloth on the ground and placed my wooden frame over it.  I have used 1”x6” pieces of lumber, screwed together at the ends.


I combined my soil on the patio, but if you don’t have a patio near your garden, I recommend that you use a tarp so you don’t lose your soil to the lawn.


Mel’s mix calls for 1/3 peat moss, 1/3 vermiculite, and 1/3 other soil products, such as manure, compost, etc.  My first two beds were made with this precise mixture.  Recently, I have wondered if vermiculite is safe.  I’m not sure if it is free of asbestos.  It is also difficult to find and is rather pricey.  For my two new beds, I have opted out of using vermiculite.  Here is what I added to EACH SQUARE:

2 bags of Organic Choice garden soil (3 cubic feet)

2 bags of peat moss (4.4 cubic feet)

2 bags of steer manure (2 cubic feet)


You need about 8 cubic feet of soil to fill your box.  Once you’ve combined your “ingredients”, fill up the frame.


To give your garden a tidy appearance and to aid in the square foot method, you will need to use small wooden dividers to section your 4’x4’ square into sixteen 1’x1’ squares.  I went the frugal route and used yarn.  I hammered nails into the frame and wrapped yarn around them.  It works just as well and can easily be removed once your plants begin to grow, although I like to leave mine.


You are now ready to plant.  Find out the recommended planting times for various vegetables, flowers or herbs.  I water by hand with a hose that has a shower attachment at the end.  As for weeding, I do that… RARELY!  With this method, I rarely have weeds.

It is truly amazing how much you can grow in one 4’x4’ square.  This winter, I harvested the following:

54 beets
64 carrots
8 spinach plants
32 radishes

I also turned one entire box into a strawberry patch.  It began with a very small plant, but it has spread to fill over half the box already.

These raised garden beds can be used on a patio or a rooftop as well.  Some who are physically unable to get down to the ground to garden can have their box built on legs where they can stand or sit to work in it.

What are you waiting for?  Get your garden beds ready and choose your seeds.  We’ll talk more about seeds in the next post.

March 14, 2011

Choosing a Food Dryer

In a previous post about drying fruit, I promised to recommend a good food dryer to you.

Being that I live in the dry Sonoran Desert, I actually dried bananas outside on a window screen for a couple of years.  I stopped doing this because I started reading about the process of drying produce and found that this was not the safest way of drying food.


I had contemplated building a solar food dryer, but I never got around to doing it.

I finally did some research on electric food dryers.  They range considerably in prices, but I found that an inexpensive brand that I could buy at Wal-Mart had received tremendous reviews.  I purchased it and have found it to be perfect for my needs.

Introducing the Snackmaster Express Food Dehydrator:

For $49, you get four trays, a recipe book, a fruit roll sheet, and 2 packs of jerky spice and cure.  You can add several trays, sold separately.  It's not as quiet as I'd like, but it gets the job done quickly!  You can't beat the price, and it seems that most people who bought this machine have been pleased with it.  And I thoroughly enjoy mine!

March 11, 2011

Taking Charge of Your Fertility... Naturally

I'm going to get a little personal in this post because it touches on a subject that too many women have little knowledge about... their fertility.

I happen to be one of those people who remained a virgin till marriage.  When I was a couple of months away from my wedding, my fiance and I discussed the subject of when we might have children.  Both of us felt that we wanted to wait a year or two before becoming parents.  The big question in my mind was how to avoid pregnancy until then.

This was a subject that no one ever discussed, so I was thoroughly ignorant.  The only thing I knew to do was use birth control pills.  I talked to my mom and she didn't have much in the way of advice, so I went to a gynecologist and asked numerous questions.  Everyone seemed to think that using "the pill" was a simple and logical solution to avoiding pregnancy.  So that's the route I chose.

In those days, I knew very little about pharmaceuticals and so little about REAL nutrition and health.  When I first got married, I realized that there was quite a lot I didn't know.  I lived near a small library and started bringing loads of books home to learn about everything a good wife/homemaker should know.  As I began to learn more, I started coming across things that talked about the dangers of birth control pills.  It had never occurred to me that their could be any health risk in swallowing those tiny pills everyday.

I grew more and more uneasy about taking the pill.  I finally sat down with the pamphlet that came in every prescription of pills (which I'd never bothered to read before).  Twenty minutes later, after reading every word of that tiny print, I was convinced that I could not put another one of those things in my mouth for the rest of my life!  When my husband came home, I made my grand announcement: I was going off the pill.

At this point, we'd been married only six months, and neither of us wanted to have children yet.  The next day I went to the library, not really sure what to look for.  I found the appropriate section and found one book that might give me the answer I was looking for: "Taking Charge of Your Fertility" by Toni Weschler.

There is no doubt in my mind that God led me to exactly what I needed.  As I read this book, I learned things about my body that I never knew before.  For the first time I understood how my monthly cycle worked and what was happening at each phase of the cycle.  This book taught me how to control my fertility naturally!  I felt set free!  I learned how to determine when I was about to ovulate so I could avoid sexual activity and therefore avoid pregnancy.  And when I WAS ready to have children, I used the same method to determine when I would be fertile.

I have successfully used this method exclusively for fifteen years.  I used the chart given in the book for about two years until I knew my body and my cycle so well that I didn't need to use it anymore.

In hindsight, I would have to say that this book was the very first step in my knowledge base of living a natural lifestyle, free from prescription drugs, processed foods, and manufactured garbage.  Little did I know that I'd be where I am today simply because I got freaked out about taking a tiny pill.  But I'm so grateful.  And I have two beautiful children!

It is my opinion that every girl ought to be taught about these things before graduating from high school. It is important for women to understand their bodies!  This book is a jewel of a find for those who want to avoid the toxic options of fertility.

March 7, 2011

Apple Cider Vinegar to Treat Heartburn

I'll never forget the first time I had heartburn.  I was pregnant for the first time, and I woke up with the most intense, painful sensation in my chest and throat.  The next day, I spoke to my midwife about it and she explained that I'd had heartburn.  She suggested combating it with a glass of milk or eating a banana to neutralize the acid.

It was a number of years before I ever experienced it again.  Being that it always hits me in the middle of the night, the last thing I want to do is get up and eat a banana.  I always went the route of drinking some milk.  This gave me about a 50% success rate in eliminating the acid discomfort in my body.

In a conversation with my mom one day, she mentioned that apple cider vinegar was the best natural remedy for heartburn and acid reflux.  That sounded crazy to me.  How could vinegar neutralize acid?  She told me that my uncle, who had serious issues with acid reflux, consistently popped the "purple pill" (Nexium).  He called my mom on the phone late one evening to ask what he could do for his acid reflux.  He ran out of pills and it was too late to get any (he lived out in the mountains).  My mom told him to try the apple cider vinegar.  He thought she was nuts.  But in desperation, he tried it.  He never returned to the "purple pill".

The next time heartburn struck me, I pulled out the Bragg apple cider vinegar from my pantry.  I mixed a little bit with some water and gagged it down.  IT WORKED!  I have had a 100% success rate with this remedy.

As with most pharmaceutical treatments, Nexium and other medications for heartburn and acid reflux come with the risk of numerous side effects, some worse than the condition being treated.  And death is not ruled out as a side effect!

On the other hand, apple cider vinegar is a food.  It has no ill side effects, and actually produces many amazing nutritionally benefits in the human body.

WHAT TO DO:  I mix about 2 tsp. apple cider vinegar with 1/4 cup of water and drink as quickly as possible.  The taste is intense, and it causes a quick mucous buildup in my mouth.  So I generally have to spit after each swallow.  But it sure beats using a toxic medication!  Some people add a little bit of honey to this mix to make it easier to swallow.  Occasionally I will have to repeat this dosage a few minutes later, but it works every time.

For those who simply cannot handle the flavor, there are apple cider tablets available, but I cannot vouch for their effectiveness since I've never tried them.  I recommend organic vinegar, and if you want the very best, get the Bragg brand, as it contains beneficial bacteria (called the Mother) as well.

It would probably be a good idea to brush your teeth after using this remedy if you have to do it often.  I'm not sure that going back to sleep after putting vinegar in your mouth is such a good idea.

Disclaimer:  I am not a medical care professional, so if you follow this advice, you do so at your own risk.  Personally, I find no more risk in this method than you would find in your daily diet.  

March 4, 2011

Dried Apples and Bananas

My generation has very little personal experience with food preservation beyond what they purchase in a can at the supermarket.  Our parents and grandparents routinely canned the bounty of their garden harvests, but again, gardening is also something that few of my generation have any experience with.

One of the easiest ways to preserve fruits and vegetables is drying them.  Dried fruit makes delicious and nutritious snacks.  Dried vegetables are great for adding to soups and stews.  We'll talk about more of the finer details of drying produce in upcoming posts.

I recently dried some bananas and apples for daytime snacks.  I chose to simply slice the apples into thin wedges because I don't have a coring tool.  If you have a coring tool, they would look really nice sliced into rings with the core cut out.  Many people will pretreat their apples with lemon juice to keep them from turning brown, but I did not do that and they turned out beautifully.  Dried apples taste great when they are lightly sprinkled with cinnamon.  Add the cinnamon BEFORE drying!


Bananas make a delicious dried snack.  I personally don't like the rock-hard store-bought version.  I like to stop drying once they are chewy, but not squishy.  Most people slice the bananas and pretreat them with lemon juice to prevent browning.  I don't do either.  I cut the banana in half in the middle, then, following one of the little grooves, I cut those segments in half lengthwise.  You are then able to divide each of these sections into three pieces by running your thumb along the other grooves.  So one banana will yield 12 thin, uniform-sized wedges when cut this way.


My dad loves to name things.  He has dubbed this version of dried bananas as "monkey bones".

Watch for upcoming posts on food drying.  I'll suggest an inexpensive food dryer, a great book, and yummy things you should try.

February 28, 2011

Herbal Tinctures

I'm pretty sure that many of my friends think I'm from another planet, or a freak of nature, and no doubt they think I'm just plain weird.  It's because I don't quite think like most people, I guess.  I've never been satisfied with following "the norm".  Not because I WANT to be different than everybody, but because the way I see it, "the norm" is not necessarily the best option.  I think it's important to continuously examine and learn about the things we put on and in our bodies.

I'm an avid learner, and I recently began learning about herbal remedies.  A friend started doing herbal classes in her home and I've been making my own tinctures in my kitchen.  It's very easy, and surprisingly inexpensive.  

What is a tincture?  Most people are accustomed to making tea from herbs, and there are tremendous health benefits that can be derived from various herbs.  But sometimes we need a more potent form than what we would get from drinking it as a tea.  That's where tinctures come in.  The herbs are placed in a medium (apple cider vinegar, glycerin, or alcohol), and all the potent and beneficial elements are extracted from the herb over a period of 4-6 weeks.  They are then taken in very small doses (usually 2-3 droppers full).

For example, the first herbal tincture I ever made was for nourishing the endocrine system.  This particular blend came already mixed and includes: wild yam, sarsaparilla, black & blue cohosh, false unicorn, dong quai, sage, licorice and dandelion.  Each of these herbs contains properties that nourish the endocrine system (which is primarily your hormones).


To make this particular tincture, you simply fill a glass jar half full with the herb blend, and cover completely with vodka or apple cider vinegar (I used the vinegar because of the added nutrients).  Cover with plastic wrap and a lid.  Shake daily for 2 weeks.  Strain, and put in a bottle with a dropper.  Take 2-3 droppers in the morning and the evening.  

Herbs take some time to accumulate in your system, so it may take a few weeks or even a couple of months before you begin to notice a difference.  This tincture can also be given to children who have reached puberty at half the adult dosage.  And the endocrine tincture is not just for women!  Men need it, too!

I got my endocrine blend from Southwest Herb, located in Mesa, Arizona.  

I'm not an expert herbalist, but I'm thrilled to share with you the things I'm learning.  One of the greatest companies for herbs is Mountain Rose Herbs, located in Eugene, Oregon.  Their herbs are inexpensive, and you might be inspired just by browsing through their website.

February 18, 2011

Laundry Day: Befriending Nature

The weather is warming up here in the desert, and for the rest of you, spring is around the corner.  I promise!  As the temperatures rise, I alter my laundry routine a bit.  I take advantage of the warmth by allowing nature to dry my clothes.


Why dry your clothes outside?

1.  It saves many dollars on your electricity bills.  To be honest, this is the number one reason why I do this.  Where I live, we are charged a much higher rate per kilowatt hour during the summer months.  Anything I can cut down on is helpful.

2.  It prolongs the life of your clothing.  Using the dryer actually breaks down the fibers in fabric much faster.  I've never seen anyone use a lint trap when they hang their clothes outside.  However, your clothes will fade much faster if you dry them in the sun.  Sun is a natural bleach.  Hang your whites in the sun!

3.  The scent!!!  There are few odors that can compare to the smell of clothes dried in the outside air.  I can only think of two things that smell better... homemade bread fresh from the oven, and citrus blossoms.

4.  Using the dryer charges your clothing with positive ions, which actually have a negative effect on your body and emotions.  When your clothes dry outside, they get charged by nature with negative ions, producing a sense of well-being when you smell them and wear them.  (For more information on the affect of positive and negative ions, read this article at altered-states.net.  Note: From the Home Base does not endorse this website.)

5.  There is something rather therapeutic about standing outside and hanging each piece of clothing.  For me, it's similar to spending time working in the garden.  Although it is one of my routine household chores, it takes on a whole new meaning when I'm standing outside quietly by myself, listening to the sounds around my neighborhood and hearing the birds sing and converse.

6.  Folding laundry is much easier.  Instead of pulling items from a tangled heap, they are already spread flat and fold in a snap!

Rather than setting up unsightly clothes lines in the backyard, I prefer stand-alone, mobile drying racks.  This allows me to move my racks to avoid direct sunlight.  When not in use, I fold them up and tuck them into the corner of the laundry room.

I've tried the wood drying racks, but they are flimsy and fall apart in a short amount of time.  They aren't really worth they money.  For a little more money (truly worth the investment), I recommend this metal collapsible drying rack:


It has 44 feet of drying space and will hold up for quite some time.  You can find these on Amazon.com.  I purchased mine at Target.  I have two, with plans to add one more.

Some people complain about the crunchiness of clothes that are dried outside.  There are three ways of dealing with this:

1.  Put clothes in dryer for 5 minutes before hanging them.

2.  Wear them anyway.  The crunchiness is gone within the first 30 minutes of wearing them.

3.  I prefer to run my towels, socks, and underwear in the dryer.  They come out softer, and I find hanging those items is too tedious for me.

February 17, 2011

For Women Only

Please be advised that this post is for women only.  If you are a guy and choose to read this, do so at your own risk.  Just remember that "I told you so!"

With the topic of Natural Living being a big part of this blog, I cannot ignore the feminine issues of life.  Allow me to introduce the Diva Cup.  This is a fabulous feminine product that I have learned to love.  I have used this product for more than 18 months now, and there is no turning back for me!

Please visit  the Diva Cup website to discover what this feminine product is, how it works, and why it is so great.  I highly recommend this product!

February 11, 2011

Herbal First Aid Kit

Because I avoid synthetic medicines and remedies, standard First Aid kits that can be purchased from the store seem mostly useless to me.  They are filled with packets of pain killers, antibiotic ointments, and other synthetic treatments.  As a result, I do not even own a First Aid kit.

The thought recently occurred to me that I could make my own using natural remedies.  After a quick search online, I came across a site that had all the information I needed to make a fabulous natural alternative.

This website describes the items you will need to buy, primarily treatments made from herbs and essential oils.  It also lists additional First Aid material that you come to expect in a standard kit, including bandages, scissors, tweezers, etc.  They have also included a handy list of remedies that can be made using the items you will keep stocked in your kit.

Some of the remedies listed include:
... anxiety
... blisters
... burns
... diarrhea
... insect bites and stings
... jet lag
... poison oak/ivy
... and several others

I asked my herbalist friend what she thought and she gave this Herbal First Aid kit a thumbs up, describing it as being very accurate and helpful.

If you are interested in creating your own natural First Aid kit, visit this page at The Herb Companion.  When you select print, all the ads are removed and you can print it to tuck into your new herbal first aid kit.

Note: From the Home Base has not audited all of The Herb Companion website.  

February 10, 2011

Blendtec... My Kitchen Favorite

Sometimes it is worth spending extra money on a kitchen tool that will enable you to eat healthier meals while making food preparation simple.  For me, it must be extraordinary and something I will use routinely in order for its cost to be justified.

A Blendtec blender is one of those tools.

I have been amazed at how much use this appliance gets and equally amazed at the number of things I use it for.  I primarily bought it because I had been wanting to grind my own wheat.  A quality electric wheat grinder is too pricy for me, and it only does one thing... grinds grain.

What have I done with my Blendtec?

SMOOTHIES: I can make breakfast smoothies for my family of four in less than one minute.

FLOUR: The most satisfying thing I've used this blender for is grinding my own flour.  I have been astounded at the difference between fresh-ground wheat flour and store-bought wheat flour.  You would have to taste it to believe how delicious it is!  Nothing has been removed, and nothing added.  And it only takes 50 seconds!

SOUP:  This blender has a soup setting.  My favorite is from the Blendtec recipe book... tortilla soup.  I love putting all that beautiful, raw produce in there with some spices and a little cheese, hitting the "soup" button, and filling four bowls with hot soup in just a matter of a couple of minutes.

ICE CREAM:  I gave away my electric ice cream maker because I can get fabulous ice cream in less than one minute with this appliance!

MAYONNAISE:  I love making homemade mayo in this blender.  It's so easy that I stopped buying store-bought mayo.

It can do so much more.  I have yet to try making my own nut butter, which it is capable of doing, too.  The Blendtec blender comes with a fabulous recipe book.  You can purchase directly from Blendtec, but I recommend you wait until a Costco near you has a demonstration.  They cost a little less and you get a much longer warranty, not to mention no shipping charges.


If you want to watch part 2 of the demo....


From Home Base does not receive any compensation from Blendtec.  This is a product that I love and feel is worth recommending.

February 1, 2011

Why Steel Cut Oats?

I had an amusing conversation with a friend about oatmeal recently.  I was sharing with her a nutritious recipe for homemade bread that called for rolled oats. 

Me: "Make sure you use old-fashioned rolled oats, not the instant stuff."

Her: "Of course.  I only use instant oatmeal for breakfast."

Me:  "Seriously?  That stuff that resembles wallpaper paste and is loaded with processed ingredients!"

Her:  "Well, how do YOU make oatmeal for breakfast?"

Oatmeal is one of the easiest breakfast foods to make, and it is highly nutritious… if you do it properly.  I recommend using steel cut oats (also called Irish or Scottish oats).  Steel cut oats are simply oats that have been cut with a blade into two or three smaller pieces.  That’s it!  In contrast, rolled oats are first steamed, then rolled in huge machines which generate more heat.  This process causes the oats to lose some of their nutritional value.

I’ve never really cared for oatmeal, but I’ve learned to like it by switching to steel cut oats and adding some yummy ingredients.  Here’s how it’s typically made in our house:

Measure out water and oats into a pot (I use 1 part oats to 3 parts water).  Add a small handful of organic raisins.  Bring to a boil.  Reduce heat to simmer and cover with a lid.  Let cook for 30-40 minutes.  When done cooking, stir in about 1/4 cup freshly ground flaxseeds (I do this in my coffee grinder) and 1-2 tsp. cinnamon.

Divide into four bowls.  Give each bowl a small scoop of brown sugar and some organic milk.

We also like to add a dollop of pumpkin butter or 1/2 a chopped apple to ramp up the flavor even more.

This is a very filling meal.  It’s easy to substitute add-ins for whatever is appealing to you.  Perhaps you prefer walnuts, other dried fruit, fresh bananas, yogurt, honey or molasses.  Use your imagination and create something wonderful for you and your family.

Another option that will reduce the cooking time and increase the nutritional value is to soak the oats in water overnight.  They do not have to be refrigerated while soaking.  With this method, you can cook them in less than 10 minutes.

January 19, 2011

About This Blog

I’m truly flabbergasted about the person I’ve turned out to be as an adult. If you knew anything about my childhood, you would probably think that it’s not so abnormal for me to be the way I am today. But if you knew the things I vowed to my mother as a teenager, you would surely laugh at me!

Let me help you understand.

First, there’s my dad. Born in a small town in Iowa, he moved to California as a small child, growing up as a good ole’ Caly-boy. After serving in the Vietnam War, he moved to Washington (the state) where he met and married my mom. Maybe he had redneck blood in him before moving to the Northwest, I don’t know.

And then there’s my mom. She grew up in northern Idaho on a farm way out in the country. She attended a one-room country school until she was a teenager. Her life consisted of frugality, resourcefulness, and all that was country life. In her teen years, her family moved to a small city where she had to adjust to a different way of life.

I was born and raised in said small city. Our house was situated on about one acre of land that used to be part of an old orchard. The house was built in the wee 1900s, and my dad learned DIY skills by gutting it and rebuilding it himself. It was closer to the edge of town, quiet, and surrounded by horse pasture. Our neighbors across the street were Finnish and grew a spectacular garden every year.

This little piece of property was my mom’s haven, a place where she could live out her dream of country life on a much smaller scale. Every summer she had a huge garden that required hours of weeding and watering every week. We always had a load of animals: chickens, rabbits, dogs, cats, hermit crabs, hamsters, and even goats! We even had a few old trees from the original orchard: a pear and several apple.

Although we ate our fair share of processed foods, my mom was always experimenting with health foods. The two that stand out in my mind the most as the worst ever: carob candy bars and tofu! I hated them both. And the health food store always smelled disgusting. My mom was amazing at making nearly everything from scratch, canning her abundance of summer produce, and letting us kids learn how to cook.

The summer before entering high school was a pivotal year for me. I decided one day that I hated the garden and I hated the goats! I did not want to spend one more day in that nasty, dirty garden. Mom would make me join my younger brothers in weeding, and she gained great pleasure from throwing earthworms and giant tomato worms on me in hopes of extracting a scream from me. Her attempts never failed! And when the goat escaped for the umpteenth time and collapsed the side of our above-ground pool in order to get a drink of water, I decided that I would rather eat her than ever have to look at her again!

That summer I struck up a deal with my mom. If she would allow me to stay far from the garden and the outdoor animals, I would do all of the family laundry for the entire summer break, bake homemade bread every week, and make dinner several evenings a week. This would allow me to stay indoors where I could keep my fingernails clean and I could listen to my music on cassette tape.

I was surprised when she agreed to it. I will never forget the hours I spent in the kitchen and laundry room. I made homemade bread by hand (no bread machine!!!) nearly every other day. I remember combing through the cookbooks to find something that I thought I could make without any help. I distinctly remember making Pavlov for dessert one night. I’d never heard of it before, but since we had all the ingredients for it, I decided to give it a try. I think that one surprised my mom.

And the laundry! Who knew that a family of five could generate mountains of it every day? At least it seemed like it was every day. I started making laundry rules for the rest of the family.

It was that summer that I swore to my mom that I would never live on a farm, I would never have a garden, and I would never have chickens, rabbits, goats, or any other “farm” animal.

“You just watch. You’ll end up marrying a cowboy and then your life will be full of those things,” she would tease regularly.

I hated it when she said that! I didn’t think it was funny. I did NOT want to marry a cowboy, much less live the farmish life she subjected me to! I made up my mind that I wanted to live in a big city. Not just any big city, either. I wanted to live somewhere hot because I hated the miserably cold winters.

Fast-forward to my twenties.

I did not marry a cowboy! I married a bona fide big-city boy with a rock star mullet. He was a drummer and had never worked in a garden, nor had he ever milked a goat, much less owned one. And to make the deal sweeter, he lived where it was HOT… Phoenix.

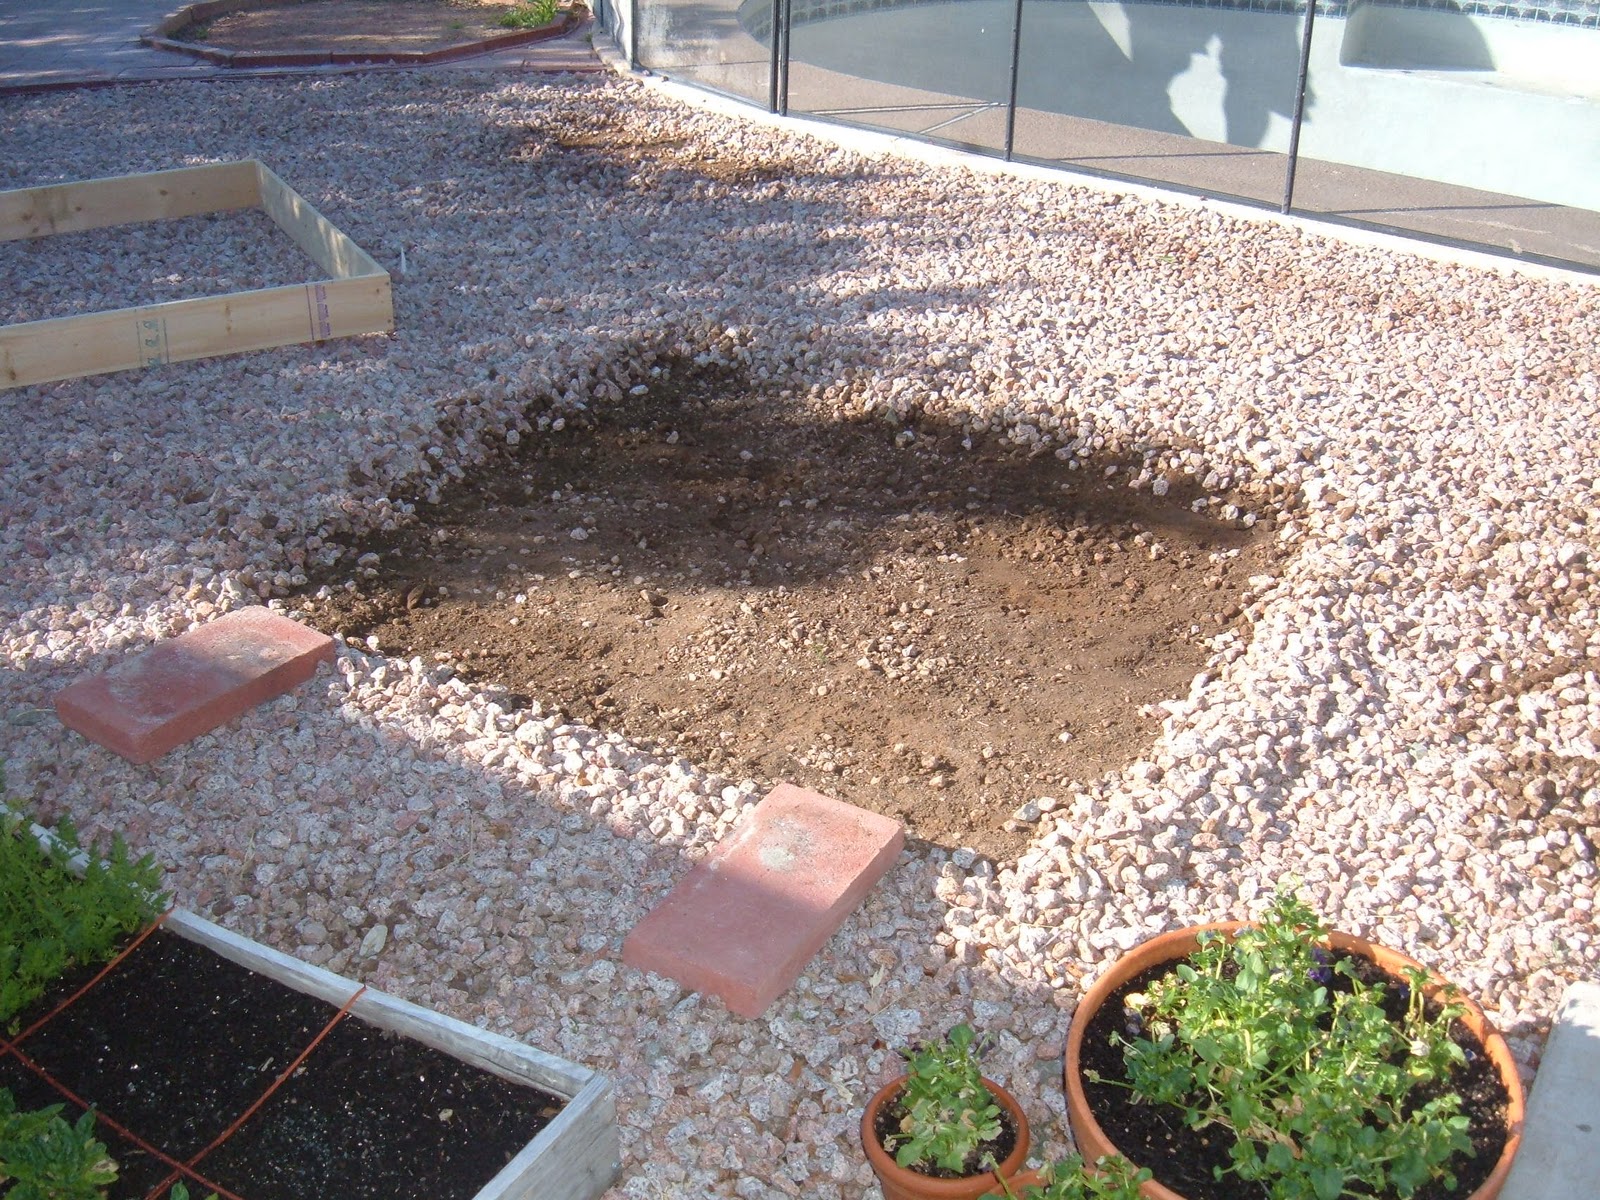
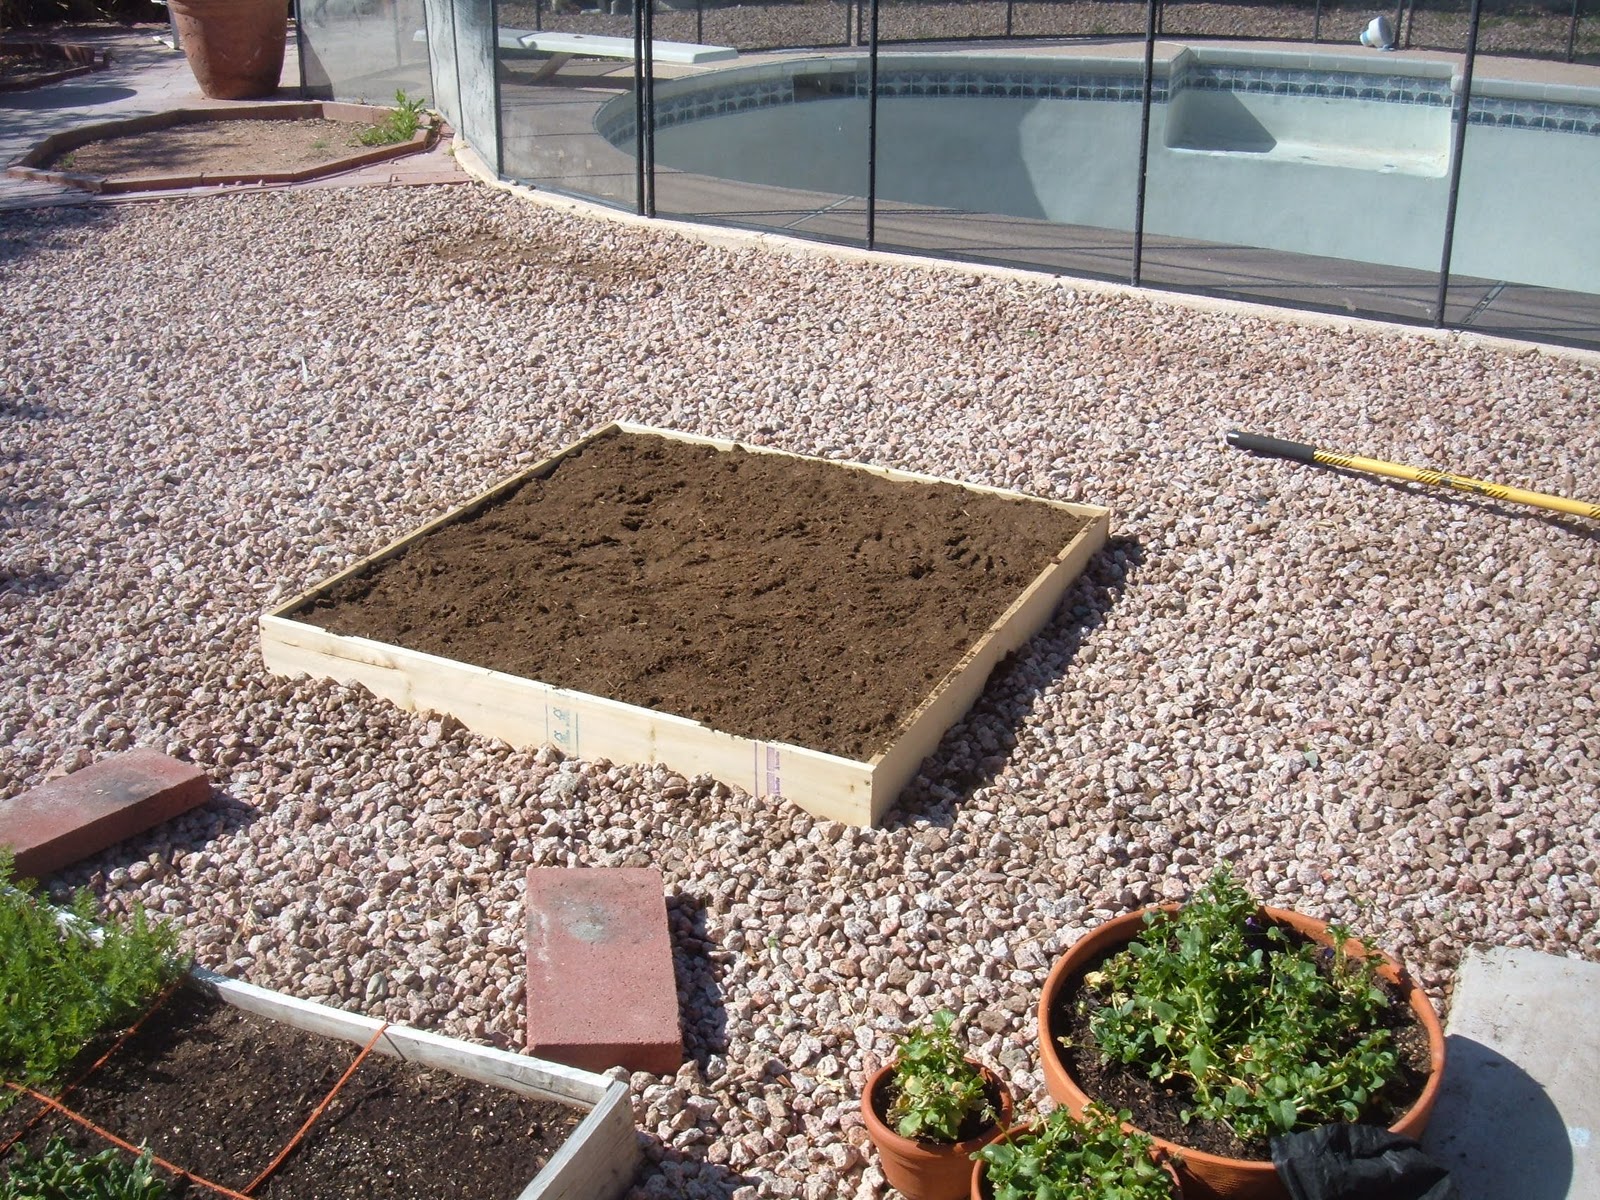
But something peculiar happened. Being a person who loves to read and research routinely, I began learning more and more about our conventional food system versus eating organic, unprocessed foods. The more I learned, the more I wanted to grow some of my own food. OUTLANDISH! How could I ever admit to my mother that I wanted to have a garden so that I could ask for advice? I spent over a year researching desert gardening because this was new territory for me. And then, to my own astonishment, I was growing tomatoes, cucumbers, carrots, peas, and beets.

My city-boy husband had a growing aviary system in our backyard with exotic parrots. One pair started laying eggs, but kept breaking them before they could hatch. The solution: buy a bantam hen and have her lay on them. As soon as we got the hen, the parrots stopped laying. But I was suddenly won over by seeing the looks on my kids’ faces every morning when they would bring a chicken egg in the house. Fresh, organic chicken eggs. How cool was that? Wait, did I really say that? But one egg a day isn’t enough for a family of four. I realized that I “needed” more chickens. And by the way, where can I find someone who has a goat so I can get some nutritious milk?

Oh dear, what has happened to me? I’m turning into my mother… and then some!!! I went farther than my mom did. I gave birth to my babies at home in my own bed (with a midwife, of course). I didn’t immunize my babies. And then when they got a little older, I homeschooled those growing kiddos.

But wait! It gets even more strange. I started making my own kombucha, grinding my own wheat for bread, and… maybe I should stop before you think that I plum lost my mind.

Now that you understand where I’m coming from a little bit more, please allow me to say, “Welcome to my blog!”